Sysmon v2.0 – new version of a small but great tool

Yesterday Microsoft released Sysmon v2.0 which was again put together by Mark Russinovich (@ and Thomas Garnier under the famous label of Sysinternals.

Here is a blogpost about the first release of Sysmon from my blog.

New in version two are:

  • Include a session GUID in each events to allow correlation of events on same logon session.
  • Logs loading of drivers or DLLs with their signatures and hashes.
  • Automatically reload configuration if changed in the registry.
  • Rule filtering to include or exclude certain events dynamically.
  • The ability to create configuration files for sysmon
  • new Eventlog entries

The Sysmon v2.0 page describes the logged events:

Events

On Vista and higher, events are stored in "Applications and Services Logs/Microsoft/Windows/Sysmon/Operational", and on older systems events are written to the System event log. Event timestamps are in UTC standard time.

The following are examples of each event type that Sysmon generates.

Event ID 1: Process creation

The process creation event provides extended information about a newly created process. The full command line provides context on the process execution. The ProcessGUID field is a unique value for this process across a domain to make event correlation easier. The hash is a full hash of the file with the algorithms in the HashType field.

Event ID 2: A process changed a file creation time

The change file creation time event is registered when a file creation time is explicitly modified by a process. This event helps tracking the real creation time of a file. Attackers may change the file creation time of a backdoor to make it look like it was installed with the operating system. Note that many processes legitimately change the creation time of a file; it does not necessarily indicate malicious activity.

Event ID 3: Network connection

The network connection event logs TCP/UDP connections on the machine. It is disabled by default. Each connection is linked to a process through the ProcessId and ProcessGUID fields. The event also contains the source and destination host names IP addresses, port numbers and IPv6 status.

Event ID 4: Sysmon service state changed

The service state change event reports the state of the Sysmon service (started or stopped).

Event ID 5: Process terminated

The process terminate event reports when a process terminates. It provides the UtcTime, ProcessGuid and ProcessId of the process.

Event ID 6: Driver loaded

The driver loaded events provides information about a driver being loaded on the system. The configured hashes are provided as well as signature information. The signature is done asynchronously for performance reasons and indicates if the file was removed after loading.

Event ID 7: Image loaded

The image loaded event logs when a module is loaded in a specific process. This event is disabled by default and needs to be configured with the –l option. It indicates the process in which the module is loaded, hashes and signature information.  The signature is done asynchronously for performance reasons and indicates if the file was removed after loading. This event should be configured carefully, as monitoring all image load events will generate a large number of events.

Event ID 255: Error

This event is generated when an error occurred within Sysmon. They can happen if the system is under heavy load and certain tasked could not be performed or a bug exists in the Sysmon service. You can report any bugs on the Sysinternals forum or over twitter ( @markrussinovich or @mxatone).


Before you can install the new version, you have to uninstall version one which is very simple:

just run “sysmon.exe –u”

After that you can install Sysmon v2.0 with any of the following parameters:

-c
Update configuration of an installed Sysmon driver or dump the current configuration if no other argument is provided. Optionally take a configuration file.

-h
Specify the hash algorithms used for image identification (default is SHA1). It supports multiple algorithms at the same time. Configuration entry: Hashing.

-i
Install service and driver. Optionally take a configuration file.

-l
Log loading of modules. Optionally take a list of processes to track. Configuration entry: ImageLoading.

-m
Install the event manifest (done on service install as well).

-n
Log network connections. Optionally take a list of processes to track. Configuration entry: Network.

-u
Uninstall service and driver.


To get more insight and see some examples just head over to the official page


BTW: Don´t forget to follow Mark (@markrussinovich) and Thomas (@mxatone) on Twitter to get the latest news about sysinternals
Sysinternals Sysmon – a great way to see what´s happening on your system


Two days ago Mark Russinovic released a new tool call sysmon in his Sysinternals Suite (which is owned by Microsoft now).

This tool can help you getting an overview about things that often happen on your system while it is or is getting compromised by creating events for specific things like the change a precess creation time, creation of new processes and optionally new network connections into the eventlog.

Here´s an extract of the features from the official website:

Overview of Sysmon Capabilities

Sysmon includes the following capabilities:

  • Logs process creation with full command line for both current and parent processes.
  • Records the hash of process image files using SHA1 (the default), MD5 or SHA256.
  • Includes a process GUID in process create events to allow for correlation of events even when Windows reuses process IDs.
  • Optionally logs network connections, including each connection’s source process, IP addresses, port numbers, hostnames and port names.
  • Detects changes in file creation time to understand when a file was really created. Modification of file create timestamps is a technique commonly used by malware to cover its tracks.
  • Generates events from early in the boot process to capture activity made by even sophisticated kernel-mode malware.

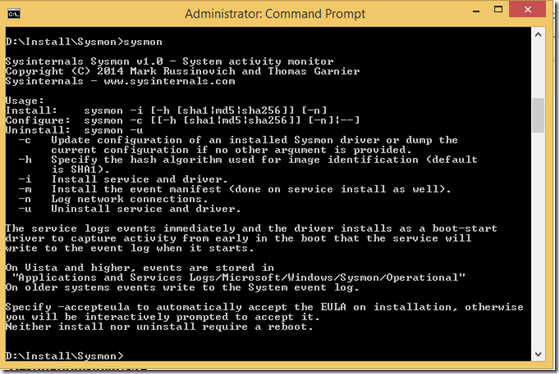
After you downloaded it, extract it and just run sysmon.exe to see the parameters it offers:

image


To install sysmon as a service and with network connection monitoring enabled, run

sysmon –i –n            

After accepting the EULA it will install and show you the result:

image


No reboot is needed, the service starts working immediately.

You can now open your Eventviewer and navigate to Applications and Services\Microsoft\Windows\Sysmon\Operational (for Windows 8.1) to see the entries:

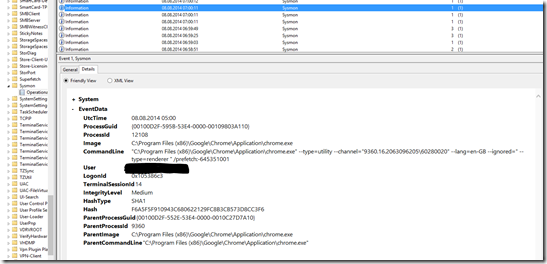
EventID 1 is for a new created process. This is the Details-tab of EventID 1:

image


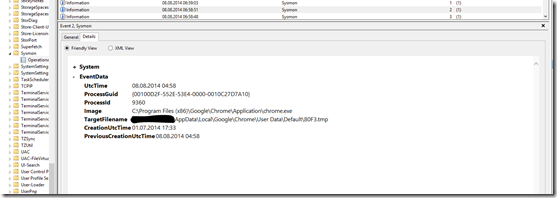
EventID 2 is for changes of a file creaton time:

image

Like Larry Stelzer in his post about sysmon, I see many entries related to chrome with this EventID.


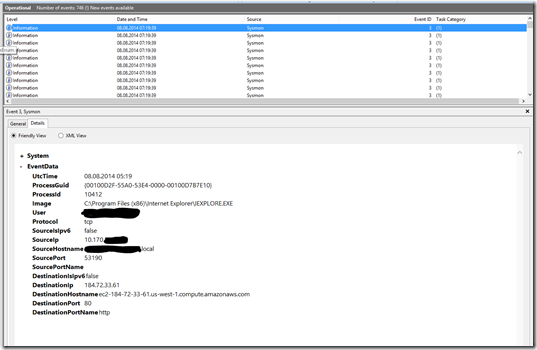
EventID 3 stands for a new network connection:

image

´

An important note on the official site states:


Note that Sysmon does not provide analysis of the events it generates, nor does it attempt to protect or hide itself from attackers.

So while this tool can help you analyze what was/is going on, it can happen that the log also gets compromised.

But: if your SIEM or Log-server tool of choice gets involved, this new tool can help catching the bad guys earlier.


Sources:

http://technet.microsoft.com/en-us/sysinternals/dn798348

http://www.zdnet.com/sysinternals-new-sysmon-tool-looks-for-intruder-traces-7000032058/

SCCM2012R2 OSD Error Download () failed 80072ee2

Lately I was struggling with a DP that got its Packages invalid several times, see here

After solving this, I had the problem that some clients failed to install.

They brought up an error “Download failed 80071ee2”. After redistributing several packages I saw that always different files in the same package were “Not able to download”. A Network error? Found nothing strange there. All the Tasksequences were working before upgrading to R2!

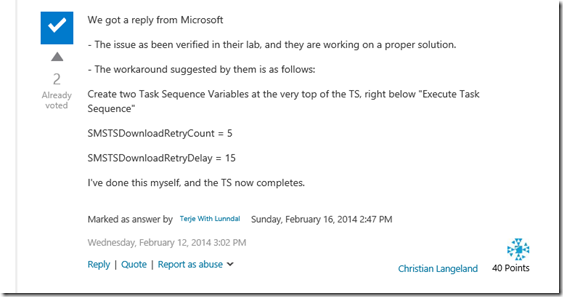
Finally I found this TechNet Thread where someone had the same issue. Especially take a look at Christian Langelands answer:

image


And this is it!

Solution:

1. Create two Tasksequence Variables right at the top of your Tasksequence:

SMSTSDownloadRetryCount with Value 5

and

SMSTSDownloadRetryDelay with Value 15

image

I also set the variable “SMSTSMPListRequestTimeout” with value 300 as mentioned in the next answer – just to be sure! Winking smile


So somehow the R2-client version is not as robust or the settings are just wrong.

As you see in the above mentioned post, Microsoft is aware of this, so maybe there is a fix/update some when.


Hope it helps!

After upgrading from SCCM2012SP1 to SCCM2012R2 some random packages are invalid #SysCtr #ConfigMgr #SCCM

Update below!

Hi,

after finally upgrading from SCCM2012SP1 to SCCM2012R2 we had the issue, that the OSD tasksequences stopped working with errors all circling around content.

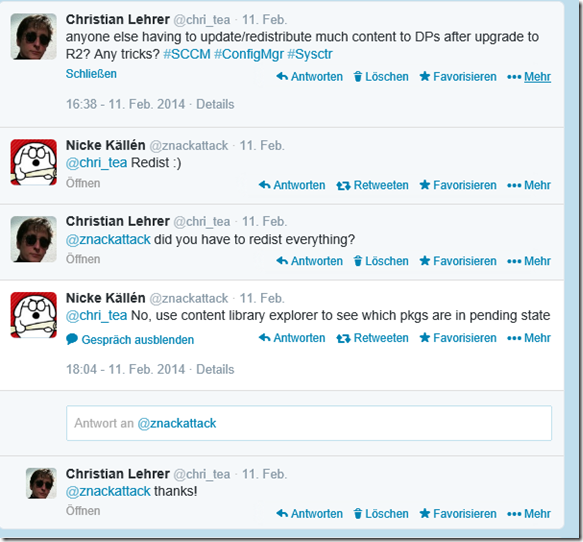
After being able to solve some of the problems by redistributing the affected content I asked on twitter if anyone else was having a similar problem after upgrading to R2, and nearly immediately a reply from @znackattack helped me further:

image

So what should you do?

Download Content Library Explorer from the System Center 2012 R2 Configuration Manager Toolkit and redistribute only the content that is marked as invalid.

A good example of how to do this can be found here: http://anoopcnair.com/2013/12/18/configmgr-sccm-2012-r2-tool-contcontentlibraryexplorerent-library-explorer/

Thanks to Nicke!

Update:

The tip from Kenny in the comments helped me t get OSD back running:

Reregister / Recompile smsdpprov.mof

If you are lucky you´ll find an error saying that compiling “smsdpprov.mof” in your Distmgr.log was not successfull.

To recompile the mof locate your “smsdpprov.mof” – most times %installpath%\bin\x64 – and use the following command:

“mofcomp.exe smsdpprov.mof”

You should then get a message that the file was compiled successfully.

I then restarted the DP (not sure if t is needed) and our delpoyment worked again.

Thanks again Kenny!

#Powershell – Compare a list of values against a list of values #PoSh

Hi everyone,

recently I had to solve the following problem:

I had to split up a list of costcenters and names in a csv-file based on the costcenter. In the first iteration the requirement was pretty easy: “If the costcenter is beginning with a 5 then the usernames shal be put into file “List1.txt”. There were several exceptions to it:

If the costcenter is 5300, 5301, 5302, 5304, the usernames must be put into “List2.txt”

All the rest should be put into file “all.txt”

So let´s start:

The csv looks like this:

costcenter; user; foo1; foo2

4711; testuser; bla1; bla2


This is how I solved the requirement in the first iteration:


#define your paths here

$importpath = "D:\test\Test_1_01.csv"
$filepath_File1 = "D:\test\List1.txt"
$filepath_File2 = "D:\test\List2.txt"
$filepath_File_all = "d:\test\all.txt"

#import csv file

$csv = Import-Csv $importpath -Delimiter ";"

# for each row of the csv compare the costcenter against the defined values
$csv | foreach-object { $cc = $_.costcenter # get the costcenter-value out of this row
                        $user = $_.user     # get user-value of this row
              
                # now the first switch is used to decide what happens when the costcenter begins with a 5.
                        switch -wildcard ($cc)
                        {
                            "5*" { switch ($cc)  # in case the costcenter begins with 5, we have our next switch command to check if it one of our exceptions:
                                    {
                                    
                                     5300 { $user  >> $filepath_File1 # in case the costcenter is 5300, the username must be put into file1.txt and file3.txt
                                            $user  >> $filepath_File_all }
                                     5301 { $user  >> $filepath_File1
                                            $user  >> $filepath_File_all }
                                     5302 { $user  >> $filepath_File1
                                            $user  >> $filepath_File_all } 
                                     5304 { $user  >> $filepath_File1
                                            $user  >> $filepath_File3_all} 
                                  
                                     default { $user  >> $filepath_File2 # the default switch-case defines what to to when none of the possible cases matches.
                                                                       # in our case, the username must be put into file2.txt and fil3.txt
                                               $user  >> $filepath_File_all }
                                     }
                                  }
                            default  { $user  >> $filepath_File_all} # all other usernames must be put into file3.txt
                        }
                    }


As with all good working solutions it did not take long until the requirements went bigger and looked like this:

1. If the costcenter is one of a list of 30 values, the username must be put into “File1.txt”

2. If the costcenter is one of a list of 15 values, the username must be put into “File2.txt”

3. If the costcenter is one of a list of  136 values (including 5000, compare this with the first iteration!), the username must be put into “File3.txt”

4. all usernames must be put into “File4.txt”

So it was clear to me from the very first moment, that the switch command would not be my weapon of choice and I had to rethink. After some thinking and searching, asking at powershell.org, I came to this solution:

To make it more flexible (as we know, requirement can change quite fast) I decided to get the values the costcenter should be compared to into separate files. Each output file needs an input file with the values in it. So for file1.txt, there is a file1_costcenters.csv with one costcenter in each line. With this setup, we can load the values easily with “get-content”

The new script looks like this:


#define your paths here

$importpath = "D:\test\Test_1_01.csv"
$filepath_File1 = "D:\test\List1.txt"
$filepath_File2 = "D:\test\List2.txt"
$filepath_File3 = "d:\test\List3.txt"
$filepath_File_all = "d:\test\all.txt"
$filepath_file1_CC = "d:\test\file1_costcenters.csv"
$filepath_file2_CC = "d:\test\file2_costcenters.csv"
$filepath_file3_CC = "d:\test\file3_costcenters.csv"

#import csv file

$csv = Import-Csv $importpath -Delimiter ";"

#import the values of the costcenter files

$file1 = get-Content "$filepath_file1_CC"
$file2 = Get-Content "$filepath_file2_CC"
$file3 = Get-Content "$filepath_file3_CC"

# for each line of the csv, check if one value in one of the compare-to files matches the costcenter and write the username to the corresponding file and the all-file

$csv | foreach-object { $cc = $_.costcenter  #get costcenter
                        $user = $_.user  #get username

                        foreach ($file1_cc in $file1) #compare each value of file1 to the costcenter of the row current row of the imported csv.
                            { if ($cc -eq $file1_cc)
                                {$user  >> $filepath_file1 # write username to file1
                                 }
                            }
                        foreach ($file2_cc in $file2)
                            { if ($cc -eq $file2_cc)
                                {$user  >> $filepath_file2
                                 }
                            }
                        foreach ($file3_cc in $file3)
                            { if ($cc -eq $file3_cc)
                                {$user  >> $filepath_file4
                                 }
                            }
                        $user  >> $filepath_file_all # put the username to the All-file
                      }


So now we have the possibility to let the end users define and change the costcenters per file and when a new file is needed, we only have to add another foreach block.

As I´m just a Powershell beginner this is probably not the best solution, so please post your suggestions to the comments.

#Powershell Oneliner: Delete Personal / Machine Certificates

While searching for a solution to delete a personal machine certificate, I again found Powershell to provide the best solution.

Let´s say you have a machine certificate Issued by CA “testca.domain.bla” and want to delete it. This is solved in a one liner in Powershell Version 3:


get-childitem -path cert:\localmachine\my | where {$_.Issuer -like ‘*testca*’} | remove-item

In Powershell Version 4, you could also use:

Get-ChildItem -Path cert:\LocalMachine\my -DnsName *domain* | Remove-Item

to remove all Certificates with the dnsname *domain* in the name.

The parameter “DnsName” was introduced with Powershell Version 4.

Instead of the path cert:\LocalMachine you could use cert:\CurrentUser for the User certificates.

Once again PowerShell ISE will help you find your way by autosensing even the certificate paths!

Really easy!


more at TechNet

#ConfigMgr #SysCtr Error loading Software Center #SCCM


After successfully installing the Configuration Manager Client on a Windows Server 2003 I encountered an error when opening the Software Center:


cwt11

After uninstalling and reinstalling the Configuration Manager Client the same error appeared.

Binging (yes, bing.com brought the solution!) the error, I found something similar here.

In this article is written, that .NET Framework 4.0 gets installed with SCCM2012 Client automatically. So I searched for it, and only found .NET Framework 3.5.

I downloaded the .NET Framework 4.0 , installed it and viola: Software Center got up without any errors 🙂

#Sysctr #SCCM create IP-ranges per AD-site the easy way

Yesterday there was a chat on Twitter about the usage of IP-Range vs. AD-Site based boundaries for System Center Configuration Manager 2012 SP1.

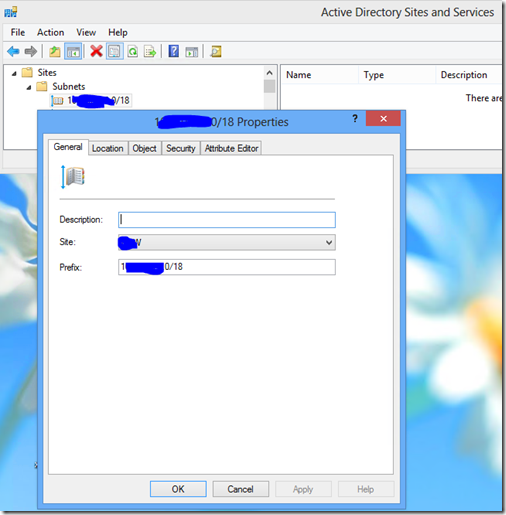
There is an easy way to get the best of both worlds. It relies on the proper configuration of IP-Subnets in the Active Directory Site Configuration (well, that should be configured properly anyway!)

image


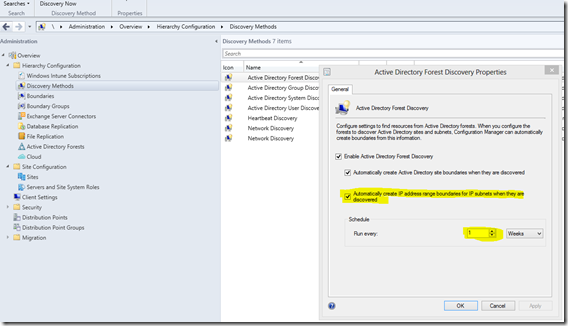
If you have your subnets configured, then switch to the SCCM Console to Administration, Hierarchy Configuration, Discovery Methods and open the Properties of the “Active Directory Forest Discovery”

Here you can enable “Automatically create IP address range boundaries for IP subnets when they are discovered


image


To keep the boundaries up to date, you can even run this discovery on a schedule.

When the discovery is run, you will find the IP-Ranges in your boundaries

image

You can then select all IP-Ranges of one site and put them into a boundary group by right clicking the selected IP-Ranges.


Hope it helps someone.


Cheers

Christian

#SCCM #SCEP Suspend SCCM2012 SP1 Endpoint Protection #SysCtr

If you ever come into a situation where you need to stop the running System Center Endpoint Protection 2012 SP1,  you will find out that there is no way to stop the service. Neither in the GUI nor the service Microsoft Antimalware Service (MsMpEng.exe) itself.

After searching a while I found the solution in this thread:

You need two tools, which will help you (not only in this case!): psexec and Process Explorer.

Copy both tools to a folder on the system and start an elevated command promt.

1. Run the command:

%yourpath%\psexec.exe –s –i %yourpath%\procexp.exe  *

Capture1

*where %yourpath% is the path you saved the tools in

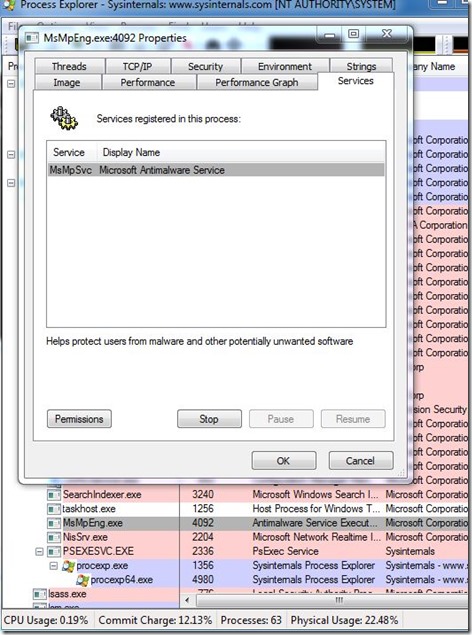
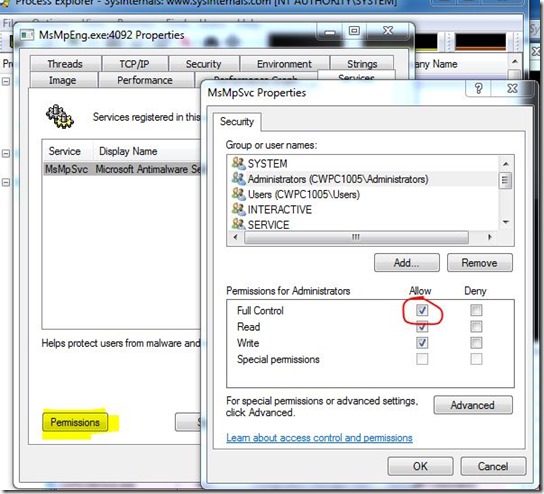
2. After accepting two EULAs (only for the first time) Process Explorer will show up. Search for a process called “MsMpEng.exe” and double click it. Switch to the “services” tab.

Capture2

3. Click on “Permissions” and give Full Control rights to the Administrators group.

Capture3

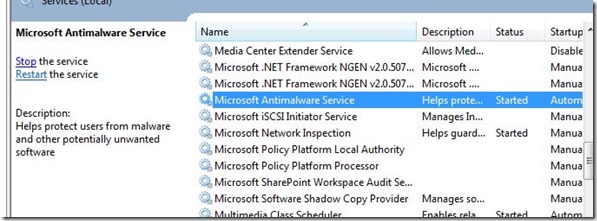
After OKing every window you can open or refresh your services.mmc and you will be able to stop the Microsoft Antimalware Service.

Capture4


As soon as you start the service again, the permissions will be set back to the original settings.

Christian

#ConfigMgr Speed up AD-Group discovered Client Push Installation #SCCM

Imagine the following situation:

You have to deploy SCCM a well controlled and step by step. You want to use (automatic) push installation.

This can be done by putting the PCs you want into AD-groups and throw some GPOs at them, to add an ConfigMgrPush Account to local admins for example.

Then Active Directory Group Discovery has to be set up to discover items in the selected AD-Group.

Now, when you put in a PC to this AD-Group, it will be discovered in a short time (5 Minutes in standard delta discovery settings).

After discovery, SCCM will try to push the client to the new PCs but it fails, because the ConfigMgr push account is not a local admin. This happens, because a reboot is needed for the PC to be aware of new group memberships and applying the GPO.

You now can wait until every PC is rebooted, or do the following:


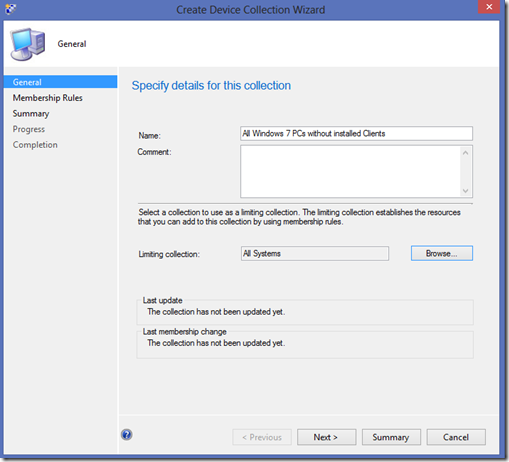
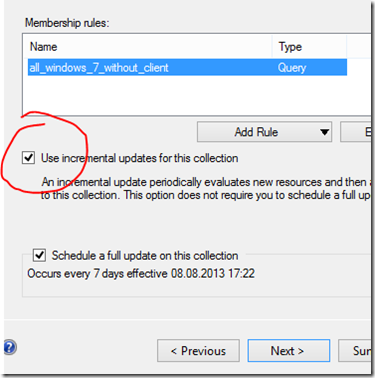
Create a collection for PCs without an installed client:

image

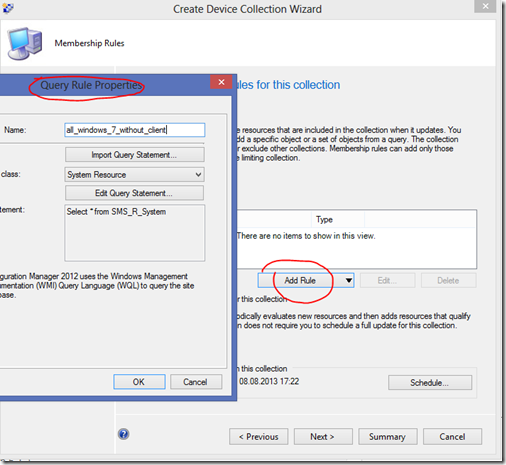
Add a new query rule

image

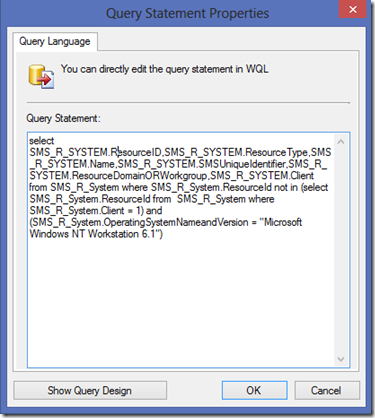
Click “Show query language” and paste the query (delete linebreaks after inserting)

select SMS_R_SYSTEM.ResourceID,SMS_R_SYSTEM.ResourceType,SMS_R_SYSTEM.Name,
SMS_R_SYSTEM.SMSUniqueIdentifier,SMS_R_SYSTEM.ResourceDomainORWorkgroup,
SMS_R_SYSTEM.Client from SMS_R_System where SMS_R_System.ResourceId not in (select SMS_R_System.ResourceId from  SMS_R_System where SMS_R_System.Client = 1) and (SMS_R_System.OperatingSystemNameandVersion = "Microsoft Windows NT Workstation 6.1")     


image


image

Now that you have created the collection, it´s time for some Powershell and psexec.

Download psexec and place it somewhere on your SCCM Server, e.g. c:\psexec

Create a powershell script that gets all members of the “no client” Collection, refreshes PC AD-Group Membership and forces a gpupdate:

$SiteServer = ‘localhost’

# Replace  YSC with your SiteCode

$SiteCode = ‘YSC’
 
$CollectionName = ‘All Windows 7 PCs without installed Clients’
 
#Retrieve SCCM collection by name
 
$Collection = get-wmiobject -NameSpace "ROOT\SMS\site_$SiteCode" -Class SMS_Collection | where {$_.Name -eq "$CollectionName"}
 
#Retrieve members of collection
 
$SMSClients = Get-WmiObject -ComputerName $SiteServer -Namespace "ROOT\SMS\site_$SiteCode" -Query "SELECT * FROM SMS_FullCollectionMembership WHERE CollectionID=’$($Collection.CollectionID)’ order by name" | select Name
 
#Try to Refresh AD-Goup Membership and force gpupdate for every collectionmember
 
ForEach ($SMSClient in $SMSClients){
 
write-host "Next Client:" $SMSClient.Name
$hostname = $smsclient.name

c:\psexec\psexec.exe \\$hostname -s cmd /c "klist -li 0x3e7 purge"
c:\psexec\psexec.exe \\$hostname -s cmd /c "gpupdate /force"
 
}

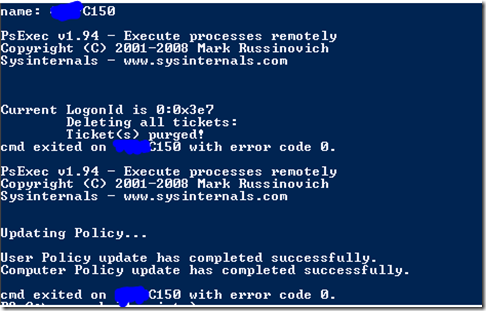
If the script runs successfully, you will get an output like

image

To get this working, the account running the script needs to have the right to access the client PC!

Now that the group policy is applied, the ConfigMgr Push Account can install the client.

To go even further you could schedule this task, or even better, let Orchestrator do the job.


sources:

http://www.jgsys.co.uk/blog/sccm-2012-pcs-without-client/

http://www.systemcentercentral.com/ping-sccm-collection-members-with-powershell-sample-script-for-configmgr-2007-and-2012/